Geek Gurl Diaries You Tube Channel has been selected for the Geek and Sundry Vlogger Competition. You have one week to help me make it into the top 30 to become a finalist. Please vote for me every day by clicking here. Voting ends on 27th June.
You've got a raspberry pi but don't know whether you should encase it or not. Never fear, here are my top 5 Pi case reviews to help you out:
1. The cheap plastic case
If you really want to keep your board free from dust, danger, and ... dogs (?) then a case is a good idea. You can purchase a very reasonable cheap plastic case from ebay for under £5 delivered with slots for all the Raspberry Pi ports, including full access to the GPIO pins for those electronic projects you have planned (like the Little Box of Geek!). Sadly it does not come with any option for mounting and it is not weather proof, which could be a problem if you want to send your pi into space or leave it outside to record weather data. The case I looked at was
2. The Punnet
Fully customisable the Punnet is a fun way to protect your pi from... well... not much. But it looks totally cool and if you have access to a printer and some card is a very cheap, almost free alternative. I enjoy getting my students and other kids creating their own designs using the punnet. They can label explain all the ports and components of the Raspberry Pi by drawing on the punnet, and colour it in how they like. It's safe to say that it is definitely not weather proof, or fully dust proof, but it might help you remember where all your cables should go, and make you smile. You can print off your own punnet using this pdf.
3. The Lego Case
I love Lego. FACT. Who doesn't? Before the Raspberry Pi came along, I used to marvel at images on the internet of full tower PC cases made out of those little bricks. Even James May's Lego house filled me full of a sense of excitement. You can build anything! Of course, a natural fit would be to build a Pi Case from Lego, and it was a teenage girl who created a great step by step tutorial explaining how first! That design has been improved upon, and I made this one using the kit supplied. What I like about this design is that the lid fits snugly but comes off if you want to access the GPIO pins or even to plug in a PiCam. It was a total fiddle following the instructions, and I had to dedicate a whole hour to it's construction. Another bonus is that you can customise it using colours and bricks that work for you, and you can use up any old Lego pieces to stop you from treading on them... ouch!
4. The PiBow Case
All my students love the PiBow Case on our classroom Raspberry Pis. They are a stunning work of art from Pimoroni, and now come in a variety of different colours, not just the original rainbow. On my birthday this year, I received a surprise gift from the guys at Pimoroni who made me my very own Geek Gurl Diaries PiBow Case, with coloured noodle cables to match. It is my most prized possession and very handy to transport my pi around in. I find PiBow Cases to be very sturdy and hard wearing. They are also clearly labelled so that you can remember where each cable goes.
5. The 'No Case' Case
Yeah okay this is cheating, but there is an argument for not using a case. One of my friends uses his Pi nearly every day to program on and he has never put it in a case. I've visited Coder Dojo's and Jams where teenagers come along, setup their Pis and have a go at a coding project, and vary rarely do any of them use a case. I guess if you are not going to use it outside or mount it onto anything (like the back of a TV or Monitor) then you don't really need to encase it. There is something very beautiful about bare electronics and if nothing else the Raspberry Pi should show us that inside all our electronic devices there is something lurking in a very similar form, and is not to be frightened of. Opening them up and having a go (under parental/adult supervision of course!) could help us learn to create and make something better!
Wow! The response to my 'New Out of Box Software' video for setting up your raspberry pi has been amazing, even though the video page on YouTube is buggy, with the video freezing on the Raspi-Config page. I've had some very kind messages about my work which will inspire me to keep going!
Setting up your Raspberry Pi for the first time can be daunting. We've all been there, Pi in one hand, empty SD card in the other wondering what on earth flashing Raspbian means. In September 2012 I made a video to help get young people started, and this is still a way of getting started with your Pi:
But now Raspberry Pi have come up with another way of getting started. The 'New Out Of Box Software' produced by Raspberry Pi allows you to copy the files you need straight onto the SD card like you would do with photo or document files, and gives you the option of what Operating System you want to install, and even provides recovery should you accidentally delete your entire file system! Here is a step by step guide to using the new system, and as always there is a video too :)
1. Formatting your SD Card:
You will need a 4GB SD Card to use the new out of the box system, and it will need to be formatted first. The best way to ensure that the card is formatted correctly for use is to download, install and use SD Formatter 4.0 from the SD Association following the on screen steps. Once installed simply place your 4GB SD Card into your computers card reader, and run the SD Formatter application. Make sure that it has the right drive selected for your card, click on Option and select 'FULL erase' from the drop down menu. When you are ready click Format. It will wipe all data from the card so make sure you select the correct drive!
Save the compressed file to your computer and extract the files. With this system you do not need to flash the SD card with the image, instead you can simply copy the extracted files from your computer to the SD card.
3. Booting for the first time:
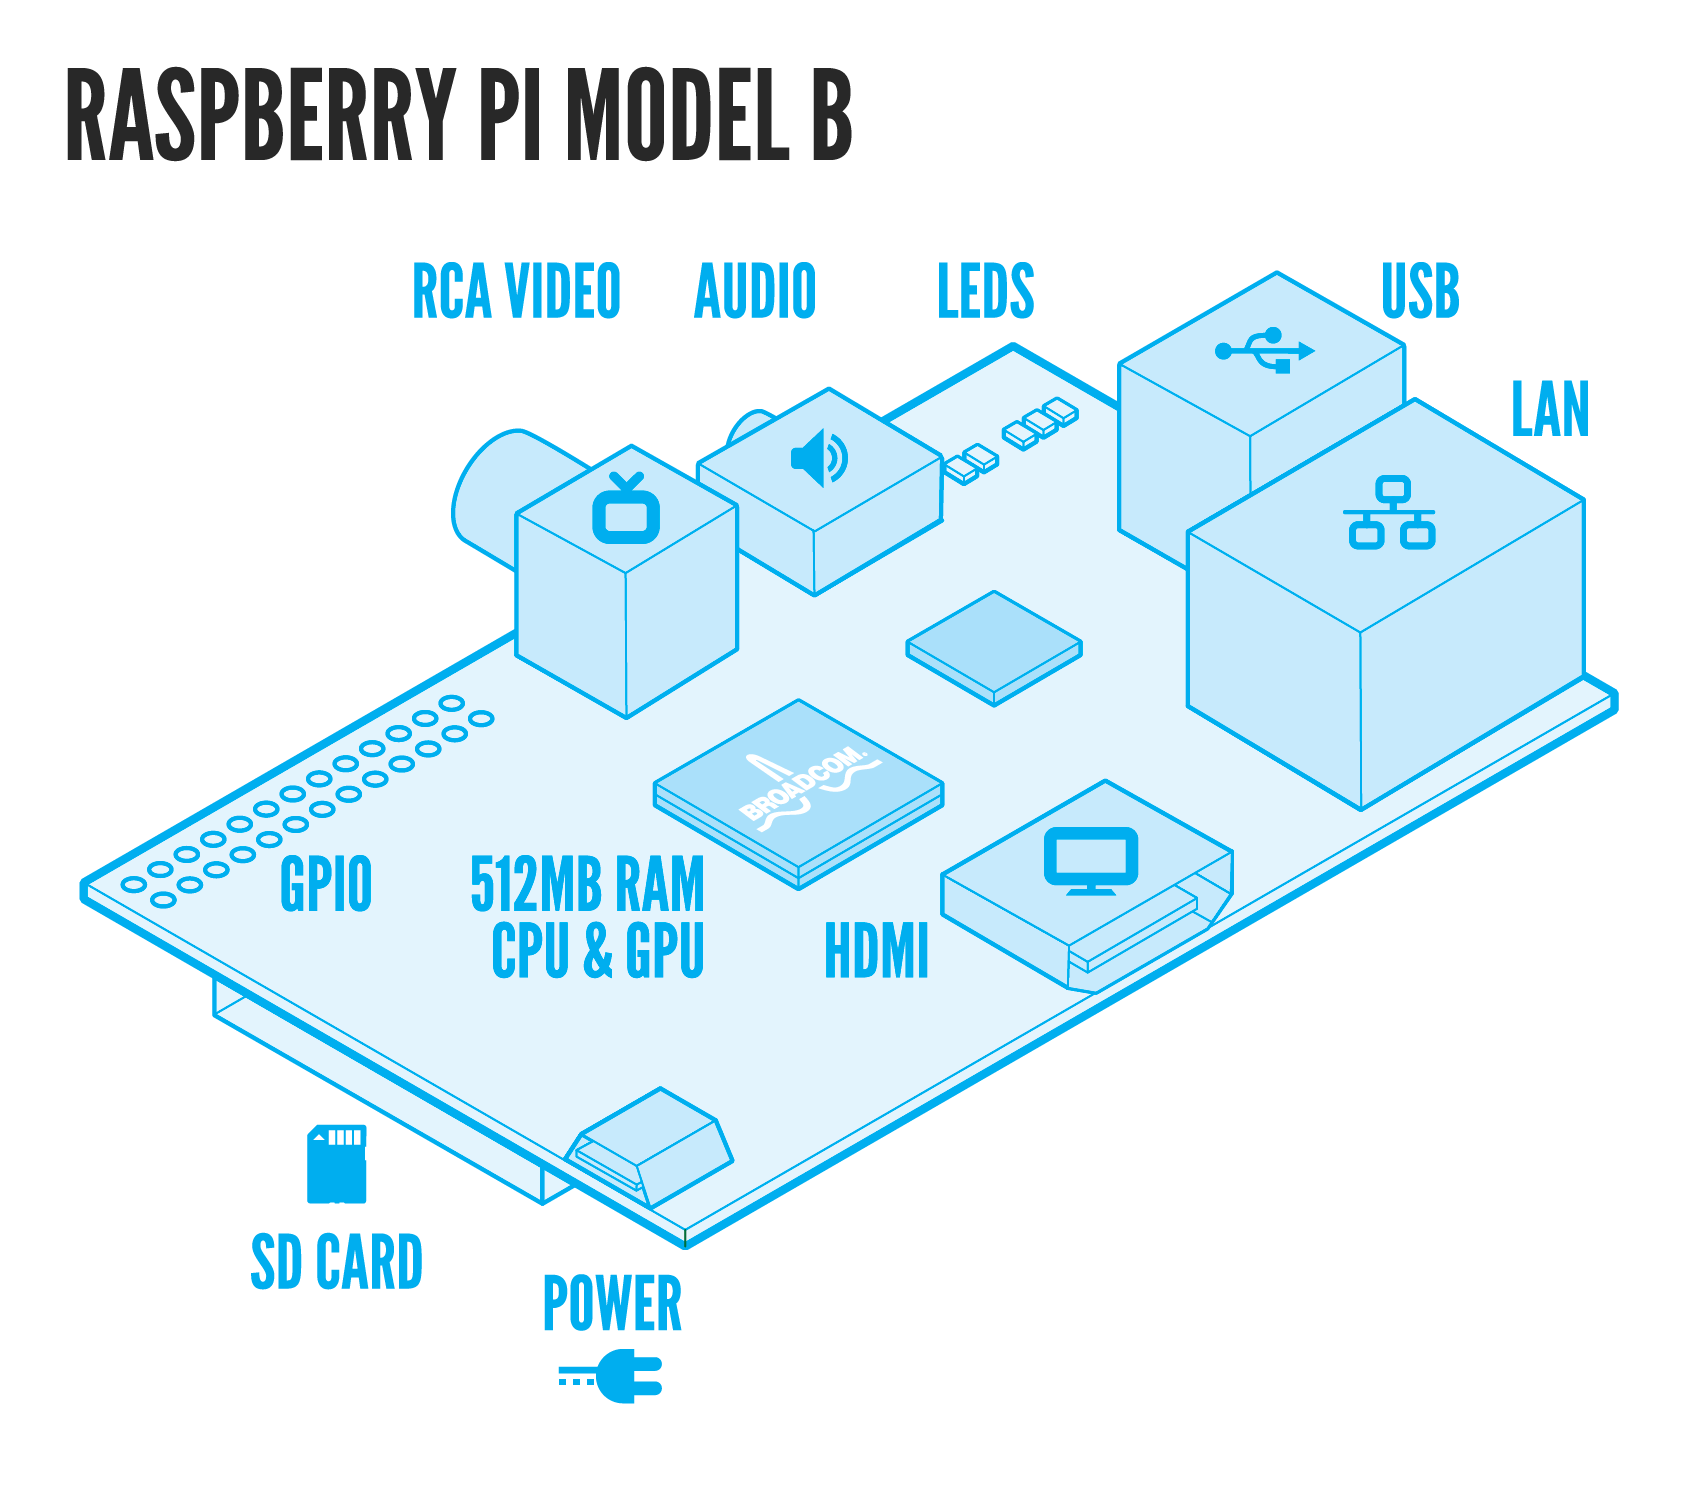
Place your SD card with the new open box software on it, into the Raspberry Pi SD Card slot and turn on your pi making sure that your keyboard, mouse, and video cable are all connected. In my video you can see that I plugged my Pi into my TV using a HDMI cable.
The new system will load and begin to re-size the SD cards partition. Partitions are used to separate parts of a storage devices from each other. Once this is compete your card will have three partitions. One called the BOOT partition which holds all the files needed to start and run your Pi, one called the recovery partition, and one to store any files that you create, or applications that you add later.
4. Installing Raspbian:
The new out of box software gives you the choice of installing one of several different operating systems. It is recommended that you install Raspbian, and you can only install one operating system at a time. Maybe you would like to try one of the other OS like Risc OS at a later date. You could always use the new out of box software on a different SD card.
You need to select the operating system that you wish to install and click 'Install OS'. Here you can also change any language settings. A warning will appear asking if you are sure you want to install the operating system as it will overwrite any file system already on the SD card. Click 'Yes'.
5. Raspi-Config:
After installation of the operating system, on the first boot, the Raspi-Config window will load where you can:
Expand the file system (not needed with this new way)
Change user password (recommended)
Enable Boot to Desktop (if you use this option you will not need to type startx after log in)
Internalization Options (to set language and timezone)
Enable Camera (use this to enable your Pi Cam, if you have one!)
Add to Rastrack (Let other people know you have a pi and where you are located http://rastrack.co.uk/)
Overclock (You can enable this if you want to squeeze a little more power out of your Pi - I'd only recommend this if you are fairly advanced as there are issues with power supplies and board/chip variation.)
Advanced Options (For advanced people - lol)
About Raspi-Config
6. Recovery:
If anything goes wrong, for example if you manage to corrupt your file system, or if you would like to try one of the other operating systems them simply hold shift when starting or booting your Pi and you will be taken to the recovery screen.